Luckyy 
Administrator
Staff
LEVEL 4
90 XP
How to Create Your macOS Virtual Machine
1. Install VirtualBox on your Windows PC by following the instructions. Click “New” to create your new virtual machine.
View attachment 486
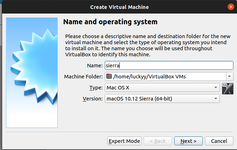
2. Use the name of your macOS version to name your virtual machine. For example, High Sierra or Mojave. The type and version should autofill with the correct settings.
View attachment 490
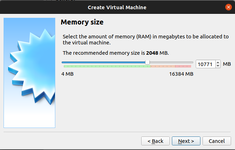
3. Select the amount of RAM to be allocated to your virtual machine. Allocating more RAM will help to speed up your virtual machine, but make sure you leave enough for your host OS (whether that’s Windows or Linux).
View attachment 487
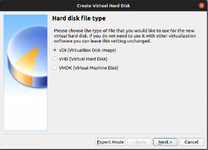
4. Choose “Create a virtual hard disk now,” and click on the “Create” button. Leave the default setting of “VDI” checked, and click “Next.”
View attachment 488
5. Decide whether you want a dynamically allocated or fixed size virtual hard drive. A dynamically allocated drive will start small and grow in size as more space is needed. A fixed-size drive will immediately take up the set amount of space on your physical hard drive.
View attachment 489
7. Choose the size of your virtual hard disk. Click on “Create” to finish creating your virtual machine.
View attachment 491
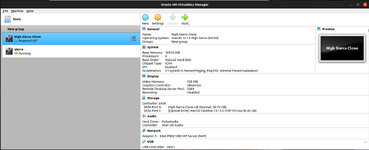
Final Configuration
1. With your virtual machine highlighted, click on the “Settings” cog. Select “System” from the side menu and make sure that “Floppy” is unticked in the “Boot Order” settings. This will ensure that your virtual machine boots from your High Sierra disc image. Make sure you set “Base Memory” to a suitable level – 2048MB at a minimum.

2. While you’re in the “System” menu, click on the “Processor” tab. Set the number of CPUs to at least two, and ensure “Enable PAE/NX” is enabled.

3. Select the “Storage” menu from the sidebar. Under Storage Devices, click on “Empty.” Click on the icon of an optical disk in the top-right corner of the screen, and select your High Sierra ISO file, ensuring “Use Host I/O cache” is enabled. Click “OK” to save the changes.

4. Proceed to the “Display” section and set “Video Memory” to 128MB, then click “OK” to save.

5. Before you can run macOS in a virtual machine, you’ll need to run the following commands from a command line or PowerShell with admin privileges on Windows or a terminal on Linux. Make sure VirtualBox is closed before you attempt this.
For Windows users, the following should work as provided. Linux users will need to add “sudo” to the start of each VBoxManage command and replace the location on the first line with the location of VirtualBox, as installed on your Linux distribution.
Code:
if you're running linux ignore the first command

raplace "macos" with the name of your  virtual machine

cd "C:\Program Files\Oracle\VirtualBox\"
VBoxManage modifyvm "macos" --cpuidset 00000001 000106e5 00100800 0098e3fd bfebfbff
VBoxManage setextradata "macos" "VBoxInternal/Devices/efi/0/Config/DmiSystemProduct" "iMac11,3"
VBoxManage setextradata "macos" "VBoxInternal/Devices/efi/0/Config/DmiSystemVersion" "1.0"
VBoxManage setextradata "macos" "VBoxInternal/Devices/efi/0/Config/DmiBoardProduct" "Iloveapple"
VBoxManage setextradata "macos" "VBoxInternal/Devices/smc/0/Config/DeviceKey" "ourhardworkbythesewordsguardedpleasedontsteal(c)AppleComputerInc"
VBoxManage setextradata "macos" "VBoxInternal/Devices/smc/0/Config/GetKeyFromRealSMC" 1
6. Finally, reopen VirtualBox, click on the green “Start” arrow to launch your Virtual Machine, then follow the instructions to install macOS.

Attachments
-
 Screenshot from 2021-11-30 06-11-20.png142.8 KB · Views: 17
 -
 Screenshot from 2021-11-30 06-12-10.png57.2 KB · Views: 15
 -
 Screenshot from 2021-11-30 06-12-41.png72 KB · Views: 14
 -
 Screenshot from 2021-11-30 06-13-15.png94.2 KB · Views: 14
 -
 Screenshot from 2021-11-30 06-06-02.png82.3 KB · Views: 14
 -
 Screenshot from 2021-11-30 06-07-05.png82.1 KB · Views: 13
Last edited:
Liked by1member: